Contact Us

Have questions?  Use this form to contact us.

We will respond to you as soon as possible.

Thank You,

Gary Detonnancourt


Harrisville, RI 02830
United States

More Than A Snapshot provides online photography education.

Booth Bay Harbor 2013-5410-color enhanced.jpg

Blog

This is the blog for More Than A Snapshot's Online Photography Classes.  In these blog posts I will give photography tips, tutorials, and show images.

Lightroom Mobile Update June 2023

Gary Detonnancourt

The June 2023 update of Adobe Lightroom Mobile brings with it improved performance and faster editing capabilities. This means that users can now get from capture to edit in less time than ever before. Additionally, the update includes bug fixes and other technical upgrades that make the program more reliable and user-friendly.

One of the most significant changes with this update is the improved user interface design and functionality. The new UI makes it easier for users to navigate through their photos and videos quickly, while also providing them with more control over their editing options. Additionally, the new version of Lightroom has added features such as Edit Replay, which allows users to quickly review their edits before committing them to a photo or video.

Other improvements include better support for RAW files, improved noise reduction capabilities, enhanced color grading tools, support for high-resolution displays on mobile devices, faster export times, and more efficient file management tools. All of these features make it easier for photographers and creatives to produce high-quality images with minimal effort.

Overall, the June 2023 update of Adobe Lightroom Mobile provides a great set of features that will benefit both professional photographers and casual shooters alike. With its improved performance and faster editing capabilities, users can now get from capture to edit in less time than ever before while still producing stunning results. Additionally, the new UI design makes it easier to navigate through photos and videos quickly while also providing more control over editing options. Finally, the additional features, such as Edit Replay, provide an extra layer of convenience when working on projects with multiple images or videos.

Sources:

RAW vs JPEG: Which Format Should You Shoot In?

Gary Detonnancourt

When it comes to photography, there are two main file formats that you can choose from - RAW and JPEG. Both have their own advantages and disadvantages, so it’s important to understand the differences between them before making a decision on which one is right for you.


RAW files are uncompressed, giving you the most control over your images during post-processing. This means that you can make adjustments to the image without losing any of its quality or detail. However, RAW files take up more space on your memory card and computer than JPEGs do.


JPEGs are compressed versions of RAW files, meaning they take up less space on your memory card and computer. They also require less processing time when editing photos in programs like Adobe Lightroom or Photoshop. The downside is that they don’t offer as much control over the image as a RAW file does and can result in some loss of detail or quality if not handled correctly.


Ultimately, it comes down to personal preference when deciding which format to shoot in. If you’re looking for maximum control over your images during post-processing, then shooting in RAW is probably the best option for you. If you’re looking for convenience and don’t need as much control over your images, then shooting in JPEG might be a better choice.


No matter which format you decide to shoot in, understanding the differences between them will help ensure that you get the best results possible from your photos!


Sources

Adjusting White Balance Settings on the Canon R50 Camera

Gary Detonnancourt

by

Gary Detonnancourt

6/8/2023

White balance is an important setting for photographers, as it helps to ensure that the colors in their images appear accurate and true-to-life. It does this by adjusting the camera’s color temperature to match the light source of the scene being photographed. Without white balance, photos can look too yellow, blue, or even green.

The Canon R50 camera offers several white balance options, including Auto White Balance (AWB), Cloudy, Color Temperature, Custom, Daylight, Flash, Fluorescent (White), Shade, and Tungsten. Each of these settings will affect how your photos look differently. For example, if you are shooting in a cloudy environment, selecting Cloudy as your white balance setting will help to make sure that your photos don’t have a blue tint to them.

To access and modify the white balance settings on the Canon R50 camera:

  1. Turn on your camera and press the Menu button

  2. Select “Shooting Menu 1” from the menu options

  3. Scroll down to “White Balance” and select it

  4. Choose one of the available white balance settings from the list

  5. Press Set/OK to save your changes

  6. Exit out of the menu when you are finished

It is also important to note that post-processing software can be used to further adjust white balance after taking a photo with your Canon R50 camera. This can help you achieve more accurate colors in your final images, if needed.

Sources:

How to use the Focus Settings on the Canon R50

Gary Detonnancourt

As a beginning photographer, it can feel overwhelming to navigate all the bells and whistles of a new camera. The Canon R50 is no exception, with an array of focus settings that can take some time to master. But fear not! In this post, we'll break down each focus setting and provide tips on how to use them effectively.

Before we jump into the different focus settings, it's important to understand the basics of focus. Focus refers to the sharpness of an image and is achieved by adjusting the distance between the lens and the camera's sensor. The Canon R50 has three main focus modes: One-Shot AF, AI Servo AF, and Manual focus. One-Shot AF is best for stationary subjects, AI Servo AF is ideal for moving subjects, and Manual focus gives you complete control over focus.

Now, let's dive into the different focus settings:

1. Face Detection AF

Face Detection AF is a helpful tool that automatically detects and focuses on human faces. This feature is especially useful for portrait photography, where you want to ensure that the subject's face is in focus. To activate Face Detection AF, press the Q button on the back of the camera, navigate to the AF method icon, and select Face Detection.

2. Eye Detection AF

Eye Detection AF takes Face Detection AF one step further by focusing specifically on the subject's eyes. This feature is perfect for portrait photography and can help create a more intimate connection between the viewer and subject. To activate Eye Detection AF, go to the AF method icon and select Eye Detection.

3. Zone AF

Zone AF is a versatile focus setting that allows you to select a specific area of the frame for the camera to focus on. This feature is helpful when photographing subjects that aren't centered in the frame or when you want to ensure that a specific area is in focus. To activate Zone AF, press the AF point selection button on the back of the camera and use the joystick to select the desired focus area.

4. Continuous AF

Continuous AF, also known as AI Servo AF, is ideal for photographing moving subjects. This focus setting continuously adjusts the focus as the subject moves, ensuring that they remain in focus throughout the shot. To activate Continuous AF, select AI Servo AF from the AF method icon.

5. Manual Focus Assist

Manual focus can be challenging, especially for beginning photographers. Luckily, the Canon R50 has a helpful tool called Manual Focus Assist that makes it easier to achieve sharp focus. When in Manual focus mode, press the magnifying glass button on the back of the camera to zoom in on the subject and adjust the focus manually. You can also use focus peaking, which highlights the areas of the image that are in focus.

In conclusion, the Canon R50 has a variety of focus settings that can help you achieve sharp, in-focus images. By understanding each focus setting and when to use them, you can take your photography to the next level. Remember, practice makes perfect, so don't be afraid to experiment with different focus settings to find what works best for you. Happy shooting!

Mastering Exposure: How to Capture Perfectly Exposed Photos with Your Canon R50 Mirrorless Camera

Gary Detonnancourt

Gary Detonnancourt

Photography Educator

6/5/2023

Introduction

This blog post will help you capture perfectly exposed photos with the Canon R50 mirrorless camera. This begins with a discussion of the exposure triangle. The exposure triangle is a fundamental concept in photography that helps photographers understand how to capture the perfect exposure. It consists of three elements: aperture, shutter speed, and ISO. Each element affects the outcome of an image differently, and mastering their combination is key to achieving great results.

In this blog post, we will explore how to use all of these settings on a Canon R50 mirrorless camera to get the best possible exposure for your photos. We'll start by looking at the basics of the exposure triangle and then move on to more advanced topics such as shutter priority mode, aperture priority mode, and manual mode. Finally, we'll provide some product recommendations for accessories or lenses that can help you achieve the perfect exposure with your Canon camera.


The Basics of the Exposure Triangle

The exposure triangle is composed of three elements: aperture, shutter speed, and ISO. Each element affects how much light enters your camera when taking a photo. Aperture controls how wide or narrow your lens opening is; it's measured in f-stops (f/2.8 being wide open). Shutter speed determines how long your camera's shutter stays open; it's measured in fractions of a second (1/250 being fast). And finally, ISO determines how sensitive your camera's sensor is to light; it's measured in numbers (100 being low sensitivity).

When shooting with a Canon R50 camera, you have several options for controlling these three elements. You can use either Manual Mode or one of two semi-automatic modes: Aperture Priority (Av) or Shutter Priority (Tv). In Manual Mode you can adjust all three elements independently; in Av mode you set the aperture while the camera sets the shutter speed; and in Tv mode you set the shutter speed while the camera sets the aperture.

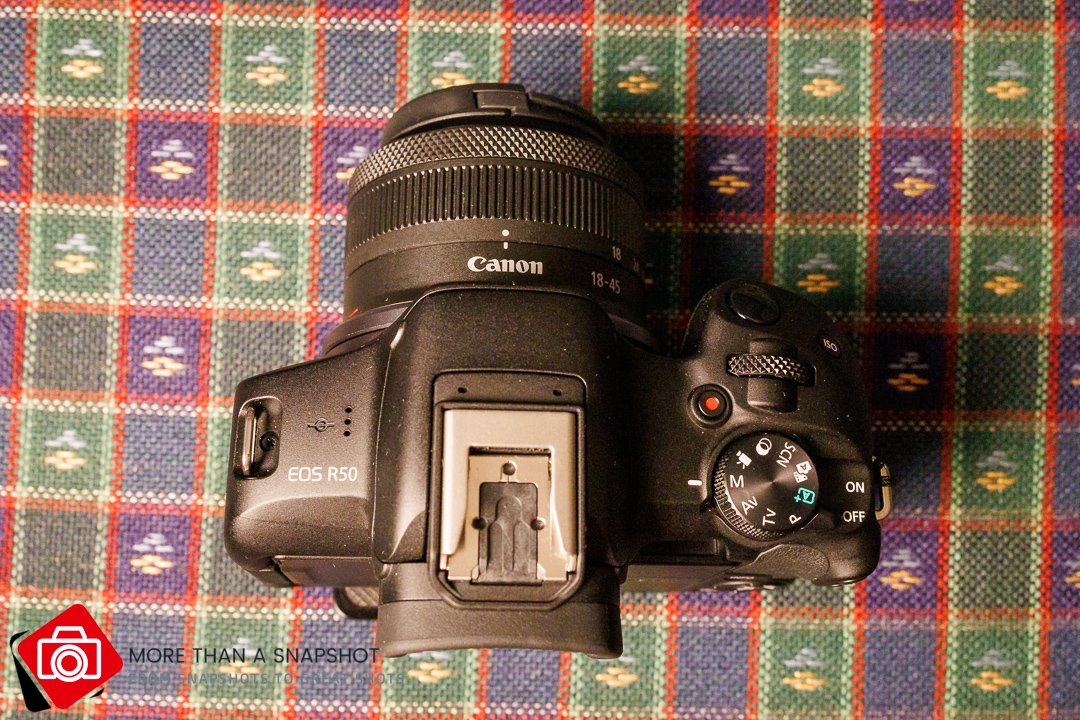
Use the Mode dial to choose, Program, Shutter Priority (Tv), Aperture Priority (AV), or Manual Mode (M).


What situations work best for each of these shooting modes

When it comes to photography, there are three main modes that you can use: Aperture Priority (AP), Shutter Priority (SP) and Manual Mode. Each of these modes has its own advantages and disadvantages, so it is important to understand when each mode should be used.

Aperture Priority is best used when you want to control the depth of field in your photos. This mode allows you to set the aperture while the camera automatically adjusts the shutter speed for correct exposure. This makes it ideal for landscape photography, as it allows you to keep the same depth of field throughout your shots.

Shutter Priority is best used when you want to control the amount of motion blur in your photos. This mode allows you to set the shutter speed while the camera automatically adjusts the aperture for correct exposure. This makes it ideal for sports or wildlife photography, as it allows you to capture fast-moving subjects without blurring them out.

Finally, Manual Mode is best used when you want complete control over both aperture and shutter speed settings. This mode requires more knowledge and experience than either AP or SP, but gives you full control over how your photos turn out. It's great for situations where precise exposure settings are needed, such as night photography or studio work.

Overall, understanding which shooting mode works best in any given situation will help ensure that your photos come out looking their best! Now let’s take a closer look at how each one of these modes work.


How to Shoot the Canon R50 in Aperture Priority Mode

If you’re looking for a great way to take your photography to the next level, then shooting with the Canon R50 in aperture priority mode is a great option. This mode allows you to set the desired aperture value and have the camera automatically adjust the shutter speed for standard exposure.

To use Aperture-Priority AE Mode (Av) on the EOS R50, start by setting the desired aperture value. You can do this by turning the dial until you get your desired value. Then focus on your subject and press the shutter button halfway down. The camera will then automatically adjust the shutter speed based on what you have chosen for your aperture value.


The dial above the shutter button controls aperture when your in Aperture Priority Mode or the shutter speed if your in Shutter Priority Mode.


How to Shoot the Canon R50 in Shutter Priority Mode


Shooting with the Canon R50 in Shutter Priority mode is a great way to take control of your photography and get creative. With shutter priority, you can set the shutter speed and the camera will automatically adjust the aperture value to obtain the correct exposure. This gives you more control over how much light enters the camera and allows you to capture motion in a unique way.

When shooting in shutter priority mode, it’s important to keep an eye on your shutter speed. The Canon R50 has a maximum shutter speed of 1/4000 sec, so if you want to freeze motion or capture fast-moving subjects, make sure your shutter speed is set accordingly. You can also use slower shutter speeds for creative effects like blurring movement or capturing light trails.


The Canon R50 also features first-curtain synchronization with built-in flash, which is useful for freezing motion when using flash. This feature works best with shutter speeds faster than 1/30 sec, so make sure your settings are adjusted accordingly before taking a shot. Additionally, it’s important to note that the Canon R50 does not have a 5-pin contact for previous accessories, so if you’re looking to use any additional equipment with this camera, be sure to check compatibility first.


Overall, shooting with the Canon R50 in Shutter Priority mode is a great way to take control of your photography and create stunning images. With its fast maximum shutter speed and built-in flash synchronization capabilities, this camera is perfect for capturing all kinds of action shots and creative effects. So get out there and start experimenting!


How to Use Manual Mode on the Canon R50

Using manual mode on the Canon R50 is easy once you know how. Here's a step-by-step guide to get you started:

Step 1: Set the Mode Dial to M

The first step to using manual mode is to set the mode dial to M. This will put your camera in manual mode and allow you to adjust the settings yourself.

Step 2: Adjust the Aperture

The aperture controls the amount of light that enters the camera. To adjust the aperture, press the AV button on the back of the camera and rotate the dial on the top of the camera. A lower number (e.g. f/2.8) will create a shallow depth of field and blur the background. A higher number (e.g. f/16) will keep everything in focus.

Step 3: Adjust the Shutter Speed

The shutter speed controls the amount of time the camera's sensor is exposed to light. To adjust the shutter speed, press the TV button on the back of the camera and rotate the dial on the top of the camera. A slower shutter speed (e.g. 1/30) will create motion blur, while a faster shutter speed (e.g. 1/1000) will freeze the action.

Step 4: Adjust the ISO

The ISO controls the sensitivity of the camera's sensor to light. To adjust the ISO, press the ISO button on the top of the camera and rotate the dial on the back of the camera. A higher ISO (e.g. 1600) will allow you to take photos in low light conditions, but it will also introduce noise into the image.

Step 5: Take Your Shot

Once you've adjusted the aperture, shutter speed, and ISO to your liking, it's time to take your shot. Press the shutter button on the top of the camera to capture your image.


How to Read a Histogram on the Canon R50

If you're a photographer, you know how important it is to understand your camera and its features. One of the most important features is the histogram, which can help you take better photos. But what is a histogram, and how do you read it? Let's take a look at what a histogram is and how to read one on the Canon R50.

The white graph is the histogram from the Canon R50.

A histogram is a graph that shows the distribution of light in an image. It looks like a bar chart with different heights for each color in the image. The left side of the graph represents dark tones while the right side represents bright tones. The higher up the bar goes, the more of that particular tone there is in the image.


To read a histogram on your Canon R50, first turn on your camera and navigate to the camera icon, then to tab 8, then to shooting info display, then to Screen info settings, and finally put a checkmark next to number 3. This will allow you to see your histogram display when you are taking pictures. Once enabled, you'll be able to view your histogram as soon as you take a picture by pressing down on your shutter button halfway.


When looking at your histogram, pay attention to where most of your bars are located. If they are all bunched up on one side or another, this means that either your image is too dark or too bright overall and needs some adjustment before taking another shot. If they are evenly distributed across both sides, then this means that your exposure levels are good and no adjustments need to be made!


By understanding how to read a histogram on your Canon R50, you can ensure that all of your photos come out perfectly exposed every time! So don't forget this important feature when shooting with your camera!

This is an example of a histogram from inside Adobe Lightroom.


Product Recommendations

Finally, here are some product recommendations for accessories or lenses that can help you achieve better exposures with your Canon R50 camera:

Canon RF 50mm f/1.8 STM Lens: This lens offers excellent low-light performance thanks to its wide maximum aperture setting (f/1.8). It also has an STM motor, which makes it ideal for video recording as well as still photography due to its quiet autofocus operation and smooth focus transitions when zooming in and out during recording sessions.

Neewer NW670 TTL Flash Speedlite: This flash offers both manual and TTL control over its output power, so you can easily adjust it depending on what type of lighting conditions you're working with at any given time—great for when shooting outdoors during sunset hours! Plus, it comes with several additional features, such as high-speed sync up to 1/8000s and rear curtain sync functions, which make it even more versatile when trying to achieve different types of exposures with your Canon R50 camera body!

Vello Auto Extension Tube Set: This extension tube set allows you to increase magnification levels without having to buy additional lenses—perfect for macro photography! It also works great when combined with other optics such as teleconverters, which further increase magnification levels even more!

With these products at hand and knowledge about how each element within the exposure triangle works together on a Canon R50 body, photographers should be able to create stunning images no matter what type of lighting conditions they're working under!


Lightroom Quick Tip: How to Import Photos into your Lightroom Catalog

Gary Detonnancourt

by

Gary Detonnancourt

Photography Educator.

How to Easily Import Your Photos Into Adobe Lightroom Classic

Adobe Lightroom Classic is a powerful photo editing and organizing software. It allows you to easily import your photos from your camera or other devices, organize them into collections, and make edits with the help of its many tools. Here's how to get started importing your photos into Lightroom Classic.


First, open Lightroom Classic on your computer. In the Library module, click the “Import…” button to open the Import window. This will allow you to select which photos you want to import into Lightroom. You can also choose where they should be stored on your computer or external hard drive.


Once you have selected the photos you want to import, click “Import” at the bottom right corner of the window. This will start the process of importing your photos into Lightroom Classic. Depending on how many photos you are importing, this could take some time.


When the import process is complete, your photos will appear in the Library module of Lightroom Classic. From here, you can view them individually or as part of a collection. You can also make edits using any of Lightroom's tools and effects.


Importing photos into Adobe Lightroom Classic is easy and straightforward once you know how it works! With just a few clicks, you can quickly get all of your photos organized and ready for editing in no time at all!


Sources:

What is Luminar Neo

Gary Detonnancourt


by

GARY DETONNANCOURT

Photography Educator.


Luminar Neo is a powerful image editor for Mac and Windows, powered by AI technologies that can simplify complex photo editing tasks, making them fast and fun. It offers an array of features that make it stand out from other photo editors. Some of the key features include:

Click on the image to buy Luminar Neo. Use the Coupon Code AFS-tMnVUz to get an extra 10% off the sale price, which ends on June 14, 2023.

  • AI-powered tools to quickly and easily enhance photos with one click.

  • Modular workflow for customizing your editing experience.

  • A library of presets to get you started quickly.

  • professional-grade filters and effects to create stunning images.

  • Advanced masking tools for precise edits.

  • Support for popular RAW formats like DNG, CR2, NEF, etc.

  • Easy sharing options to share your work with friends and family.

Luminar Neo is designed to be easy to use yet powerful enough for professional photographers and enthusiasts alike. With its intuitive user interface and AI technology, it makes editing photos faster than ever before!

Revolutionize Your Image Editing with Adobe Photoshop's Generative Fill: A Step-by-Step Guide to Mastering this Powerful Tool

Gary Detonnancourt


by

GARY DETONNANCOURT

Photography Educator.


What is Generative Fill in Adobe Photoshop?

Generative Fill is a feature in Adobe Photoshop that uses artificial intelligence (AI) and deep neural networks to analyze an image and synthesize new pixels. This allows photographers to edit photos with a click and a few words, making it easier to create stunning results with less editing time.


How Does Generative Fill Work?

Generative Fill works by using Adobe Stock images to add appropriate shadows, reflections, lighting, and perspective to the original photo. This helps photographers create more realistic images without spending hours manually editing each one. The AI engine also helps fill in any gaps or missing pieces of the image, giving you a complete picture that looks like it was taken from the real world.


Use Cases for Generative Fill

Generative Fill can be used for a variety of purposes, including removing objects from photos without leaving weird glitches in the result. It can also be used to expand album cover artwork or create unique artwork from your own photos. Photographers can also use this feature to quickly enhance their images with realistic lighting and shadows that would otherwise take hours of manual work.


Step-by-Step Instructions on Using Generative Fill

  1. Open your photo in Adobe Photoshop

  2. Select “Generate” from the top menu bar

  3. Select “Fill” from the dropdown menu

  4. Choose which elements you want to add or remove from your photo

  5. Adjust any settings as needed

  6. Click “OK” when you are satisfied with your edits

To get the best results with Generative Fill, make sure you have selected high-quality stock images as well as adjusted all settings correctly before clicking “OK”. Additionally, try experimenting with different combinations of elements to see what works best for your particular project!

Fugifilm XT-5 Firmware Update Ver.2.00: Enhanced Features, Wireless Communication, and Subject Detection

Gary Detonnancourt


by

GARY DETONNANCOURT

Photography Educator.


Fujifilm has released a new firmware update, Ver.2.00, for its GFX and X series cameras. This update includes several exciting new features that will enhance your photography experience.

One of the biggest updates is the new application software called "FUJIFILM XApp". It allows you to quickly and easily transfer photos and videos wirelessly from your camera to your smartphone or tablet. This means you can share your images with others without having to use cables or memory cards.

The new firmware also improves AI subject detection, making it easier to detect and focus on small or difficult-to-see subjects. The update adds new subject categories such as insects and drones, which makes it perfect for nature or wildlife photographers.

Additionally, the dynamic tracking performance has been enhanced with improved AF algorithms, making it easier to track and keep subjects in focus even when they are moving at high speed. This is great for sports and action photographers.

Finally, the update fixes minor bugs, which will improve the overall stability and reliability of your camera.

Overall, this firmware update Ver.2.00 is an exciting release for photographers using Fujifilm GFX and X series cameras. It brings a wide range of new features and improvements that enhance your shooting experience, making it easier to take stunning photos and share them with others. To get started, simply download the firmware update and follow the instructions provided by Fujifilm.